Building or Repairing a Marine Switch Panel: Wire, Breakers, and Connections
A dead switch, a corroded breaker, or a panel that’s been added to one accessory at a time until nobody’s sure what half the switches do — this is one of those projects that looks intimidating until you break it into the handful of things that actually matter. Building a panel from scratch and repairing an existing one use the same skills; this covers both.
Why tinned wire, not bare copper
Standard automotive-style copper wire corrodes anywhere moisture gets to it, and on a boat, moisture gets everywhere eventually — condensation inside a console, humidity below decks, salt air working its way into spaces that never see a drop of standing water. Tinned copper wire has each individual strand coated in a thin layer of tin before the insulation goes on, and that coating is what keeps corrosion from creeping into the strands and up the wire over time, well beyond just the exposed ends. It’s the standard construction for marine-grade wire for exactly this reason, and it’s worth specifying by name when buying wire rather than assuming “marine” on the label means it’s actually tinned — check the spec, not just the marketing.
Sizing wires and jumpers to the actual circuit, not “whatever’s on hand”
This is the step that gets skipped most often on a DIY panel, and it’s the one with real safety consequences. Every circuit should be sized using the actual current draw of the device and the real length of wire run — out to the device and back, not just the one-way distance — using the standard formula: circular mil area needed = (10.75 × amps × round-trip feet) ÷ allowable voltage drop in volts. Panel-fed circuits that are critical — anything electronic, navigation lights, bilge pumps — should be sized for no more than 3% voltage drop; general accessories can go up to 10%. Undersized wire on a panel circuit shows up as a device that runs weak or flickers, not as an obvious failure, which is exactly why it’s easy to get away with for a while before it becomes a real problem.
Pre-made wire jumpers (the short factory-terminated leads sold specifically for panel-to-switch and switch-to-breaker connections) are worth using instead of hand-cutting and terminating every short jumper yourself — they save real time, and because they’re built to a known gauge and length, there’s no guessing on the sizing math for those specific short runs. Save the sizing calculation for the longer runs from the panel out to each actual device, where the numbers matter more.
Breakers: size to the wire, not just the device
A circuit breaker’s job is to protect the wire from overheating, not to protect the device — which means the breaker amperage should be chosen based on what the wire can safely carry, with the device’s actual draw as the floor, not the ceiling. A breaker rated higher than the wire’s safe ampacity defeats the purpose entirely: the wire can overheat and the breaker never trips, because it’s not sized to protect that wire in the first place. If a device draws 8 amps and the wire run is rated for 20 amps, the breaker should land somewhere that protects the wire, not necessarily right at the device’s exact draw. Push-to-reset thermal breakers are the standard for accessory panels — they trip on overcurrent or overheating and reset with a simple press once the fault clears, no fuse to hunt down and replace at the worst time.
Heat shrink connectors: adhesive-lined, not just heat shrink
Plain heat shrink tubing (no adhesive) shrinks down and covers the connection, but it doesn’t actually seal it — there’s still a path for moisture to wick in at the ends. Adhesive-lined heat shrink connectors have a layer of hot-melt adhesive inside that flows and seals both ends of the connector when heated, creating an actual environmental seal rather than just a cosmetic cover. On a boat, that difference is the whole point — a crimped connection covered in plain heat shrink will still corrode from moisture creeping in at the open ends over time, while a properly heated adhesive-lined connector keeps it out.
Technique matters here too: heat gradually and keep the heat source moving rather than parking it in one spot, and stop the moment you see the adhesive start to bead out both ends — that’s the sign it’s sealed. Too much heat too fast scorches or melts the wire’s own insulation before the connector has a chance to seal properly, which trades one failure point for another.
Building or repairing the panel, in order
Gather everything before starting — panel blank or replacement panel, breakers sized to your circuits, switches, switch covers, tinned wire in the gauges you calculated, terminals, heat shrink connectors, cable ties, a proper ratcheting crimper, and a heat gun. Buying pieces that are designed to fit together (matched breaker/switch/cover systems) saves a lot of fitting headaches versus mixing brands and hoping the cutouts line up.
Mount breakers first, then switches, checking switch orientation before locking anything in — it’s a lot easier to notice an upside-down switch before it’s wired than after. Snap on switch covers once the switches are seated correctly.
Cut wire to length with margin, strip carefully — stripping too deep nicks the strands underneath and quietly reduces the wire’s actual capacity even though the insulation looks fine — and crimp each terminal with a proper ratcheting crimper, not a cheap pinch-style tool that can crush a terminal without fully seating it. Give every crimped terminal a firm tug before moving on; anything that pulls loose gets redone now, not discovered later on the water.
Heat shrink and seal, then connect everything to the actual power feed and bus bar, keeping polarity and circuit identity organized with striped or labeled wire as you go — six months from now, “brown wire” means nothing, but a labeled circuit still makes sense.
Cable tie the run in a way that keeps wires organized and off anything that vibrates or moves, and leave a little slack rather than pulling everything drum-tight — a boat flexes and vibrates constantly, and a dead-straight, zero-slack wire run has nowhere to go when it does.
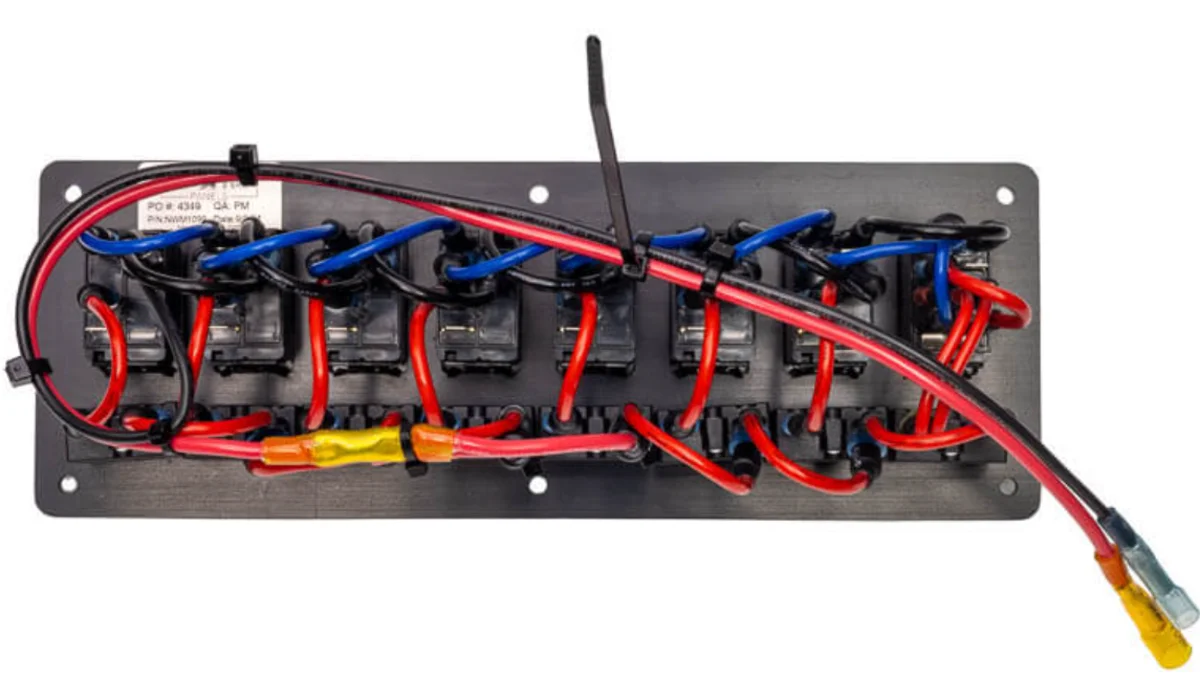
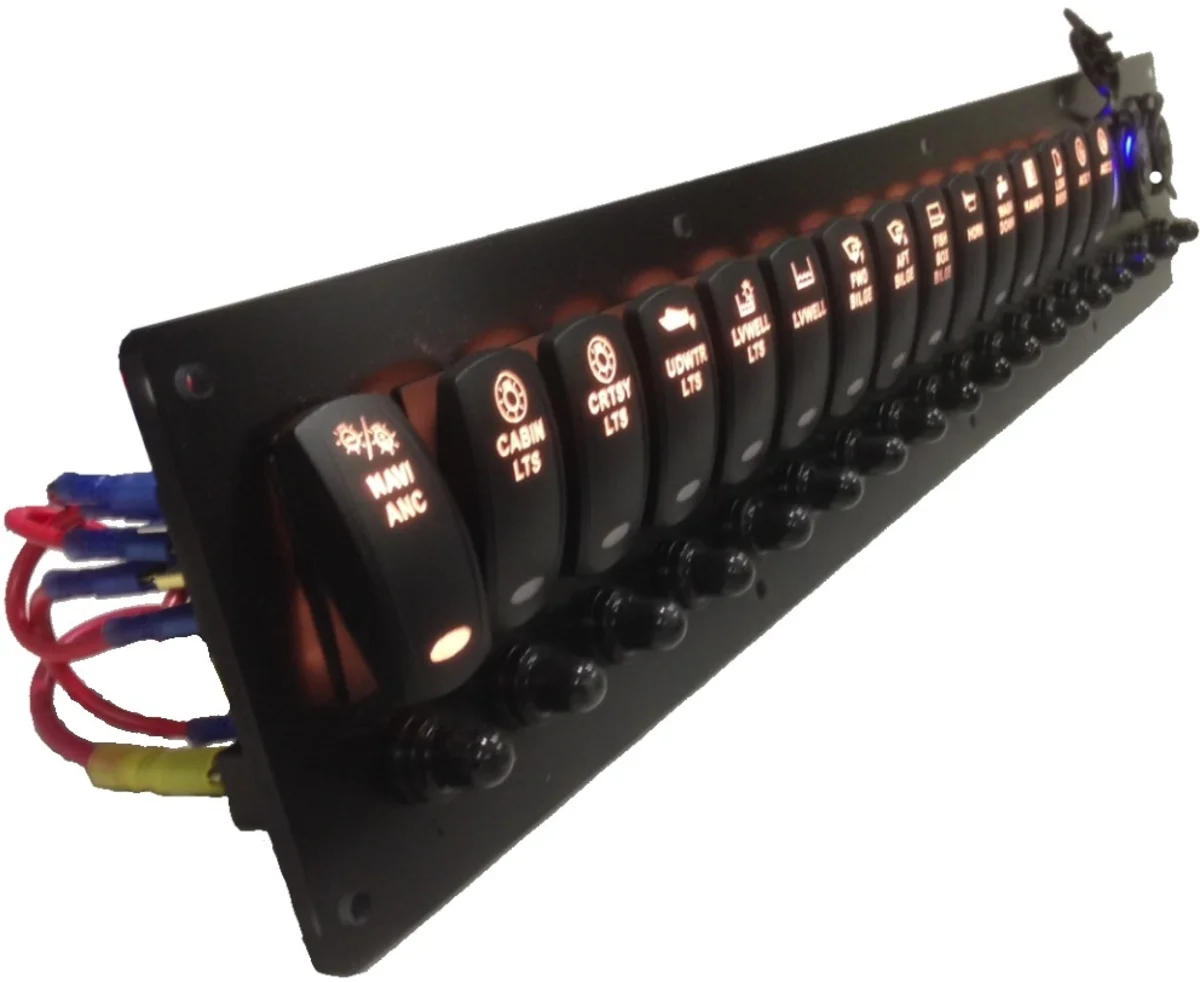
This is what all of that actually looks like put together — jumpers routed off the breakers, wires cable-tied into organized runs rather than left loose, and a common bus feeding the whole panel from one point instead of a dozen separate connections back to the battery.
The alternative: going digital instead of hardwired
Everything above assumes a traditional panel — physical breakers, physical switches, a dedicated wire run for every circuit. That’s not the only option anymore. Garmin Boat Switch is Garmin’s own digital switching module: it replaces the fuse box and physical switches entirely, communicates over the boat’s NMEA 2000 network, and lets you control up to 20 circuits from the chartplotter screen instead of a bank of rockers. CZone is the more established digital switching ecosystem it’s built on — modular, distributed relay units mounted near the actual loads instead of one central panel, with a single data network cable carrying the control signal rather than a dedicated power wire run back to a central point for every circuit. It’s common on larger boats and a lot of OEM installs (pontoon and tow-boat builders in particular have leaned into it) because it cuts down dramatically on total wire runs and lets you rename, regroup, or reprogram circuits in software instead of relabeling a physical switch. See the Garmin Boat Switch overview for the real channel breakdown and specs, and the setup and wiring guide for the actual install — it’s a legitimate alternative to everything above, not a gimmick.
The one thing worth knowing before going all-digital: even on a boat with full digital switching, a handful of circuits are worth keeping on a real, physical, hardwired switch rather than routed through the network — anything you need instant, guaranteed access to regardless of whether the display, the network, or the control module itself is working. Bilge pumps (especially the automatic float-switch circuit — see the bilge pump buying guide for why that one specifically shouldn’t depend on anything else being powered up), the engine kill switch, and nav lights are the usual candidates: the kind of circuit where “wait for the MFD to boot” or “the network module glitched” isn’t an acceptable answer. A digital system is genuinely good technology, but it adds a dependency — the display, the network, and the control module all have to be working — that a dumb mechanical switch simply doesn’t have. Most boats that go digital still keep 3-5 critical circuits hardwired for exactly this reason.
What to actually buy
The panel itself: New Wire Marine’s blank 12-switch panel in Matte Black is the right starting point if you’re building fresh rather than repairing an existing layout — 3/16” ABS plastic punched for 12 switch cutouts, sold blank so you pick your own switches and breakers instead of being locked into whatever came pre-installed on a combo unit. It runs $18-$39 depending on size and color. This one’s a direct order from New Wire Marine rather than an Amazon listing, so there’s no affiliate link on it — it’s here because it’s genuinely the right part for this job, not because it pays a commission.
The switches: Nilight’s 6-pack of 5-pin SPST rocker switches is the practical way to fill a blank panel — $18.89 for six switches with matching jumper wire sets included, which ties directly into the pre-made jumper point above. They’re rated 20A at 12V, waterproof per the listing, and sized for the standard 5-pin rocker cutout most blank panels (including the New Wire Marine one above) are punched for. One thing worth checking before ordering a full set: a few reviewers note the cutout tolerance runs tight enough that some panels need the hole opened up slightly, so measure your actual panel cutout before assuming a drop-in fit.
A different switch style, for circuits where it makes sense: the APIELE 16mm latching push-button switch is worth considering anywhere a lit push-button reads better than a rocker — a livewell pump or a circuit you want an obvious “it’s on” indicator for. At $8.98 with a 4.7-star rating across nearly 2,900 reviews, it’s a 5-amp switch built for a 0.63” mounting hole, IP65-rated, and comes with a quick-connect wire socket rather than bare terminals to crimp yourself. It’s a different footprint than the rocker switches above, so treat it as a panel-layout decision made up front, not a mid-build swap.
The breaker: the Blue Sea Systems 7056 push-button breaker is the other half of a blank-panel build — a 15-amp thermal breaker with a trip-free design that can’t be held “on” through a fault, ignition-protected for gasoline engine spaces, and built with quick-connect spade terminals that match the rest of this parts list. At $6.15 it’s cheap enough to buy one per circuit sized correctly rather than stretching a single breaker across more amperage than it should carry, which is exactly the sizing principle covered above. One caveat straight from the spec sheet: it’s not a waterproof unit, so it belongs behind a dry panel face, not somewhere it’ll see direct spray.
Tinned wire: Ancor tinned copper primary wire, 14 AWG in 100-foot rolls, is the standard reference point for what “marine-grade” wire is actually supposed to be — buy the gauge your sizing math actually calls for, not just whatever’s cheapest.
Heat shrink connectors: Ancor’s adhesive-lined heat shrink butt connector kit is the real deal — adhesive-lined, not the cheap plain-shrink connectors that leave the ends unsealed.
The crimper: a proper ratcheting tool matters more than people expect — the haisstronica ratcheting crimper is inexpensive, color-coded to connector size, and reviewers consistently note it seats a crimp fully without piercing the connector the way cheaper pinch-style crimpers do.
Dos and don’ts
Do size every circuit to the actual device draw and real wire length, not to whatever gauge happens to be in the spool already.
Do match the breaker to what the wire can safely carry, with the device’s draw as a minimum, not the target.
Do use adhesive-lined heat shrink on every connection below decks or anywhere moisture can reach it — this is not the place to save a few cents on plain crimp-and-tape.
Don’t reuse old, corroded terminals on new wiring just because they “still fit” — a terminal that’s started corroding is already compromised underneath, even if it looks fine on the surface.
Don’t oversize a breaker to stop it from nuisance-tripping — a breaker that trips often is telling you the circuit is overloaded or the wire is undersized, not that the breaker is too sensitive.
Don’t skip labeling as you go, thinking you’ll remember which wire is which — you won’t, and neither will the next person who has to troubleshoot this panel.
Bottom line
A marine switch panel isn’t complicated once it’s broken into its actual parts: tinned wire sized to the real circuit, breakers that protect the wire rather than just the device, and adhesive-lined heat shrink on every connection that has any chance of seeing moisture. Get those three things right and the rest — mounting, labeling, cable ties — is just careful assembly. Whether you build it hardwired or go digital with something like Garmin Boat Switch or CZone, keep a few genuinely critical circuits on a dumb physical switch that doesn’t care if a screen or a network module is having a bad day. For the deeper math on wire sizing and voltage drop specifically, or how this connects to the boat’s NMEA 2000 backbone and bilge pump circuits, see the NMEA 2000 setup guide and the bilge pump buying guide — both run on the same wiring principles as the panel itself.
This article may contain affiliate links. If you buy through them, we may earn a small commission at no extra cost to you. Learn more.