Wiring a Wahoo Rig: The Haywire Twist and the Skirt-Over-Ballyhoo Pin Rig
The high-speed wahoo program and the planer setup both mention the same two things in passing: wire leader, and a skirt pulled over a rigged ballyhoo. Neither one stops to actually show how to tie the wire or build the bait, and both are worth doing right — a bad haywire twist fails at the worst moment, and a sloppy bait rig either spins on the troll or gets bitten off behind the hook. Here’s both, in detail.
Why wire, and why single-strand
Wahoo teeth cut through mono and fluorocarbon leader like they’re not there, so every rig that might see a wahoo needs wire between the hook and the main leader — no exceptions. The choice that matters beyond “wire, not mono” is single-strand versus braided cable: single-strand is the standard for wahoo specifically because a wahoo’s teeth can work through braided cable strand by strand — essentially flossing it apart under pressure — where a single solid wire has nothing to pick apart. Cable still has its place on rigs built mainly for other species, but a dedicated wahoo bait should be single-strand.
Gauge scales to the target. King mackerel rigs run lighter, roughly #4–#7 single-strand (about 30–70 lb test) since a smaller, less toothy fish doesn’t need the heavier wire and a lighter gauge keeps the bait looking more natural — see the king mackerel rigging guide for that end of the spectrum. Wahoo call for heavier wire, typically #9–#12 single-strand (roughly 90–200+ lb test), because they’re bigger, faster, and have a genuinely sharper bite than a king.
Tying the haywire twist
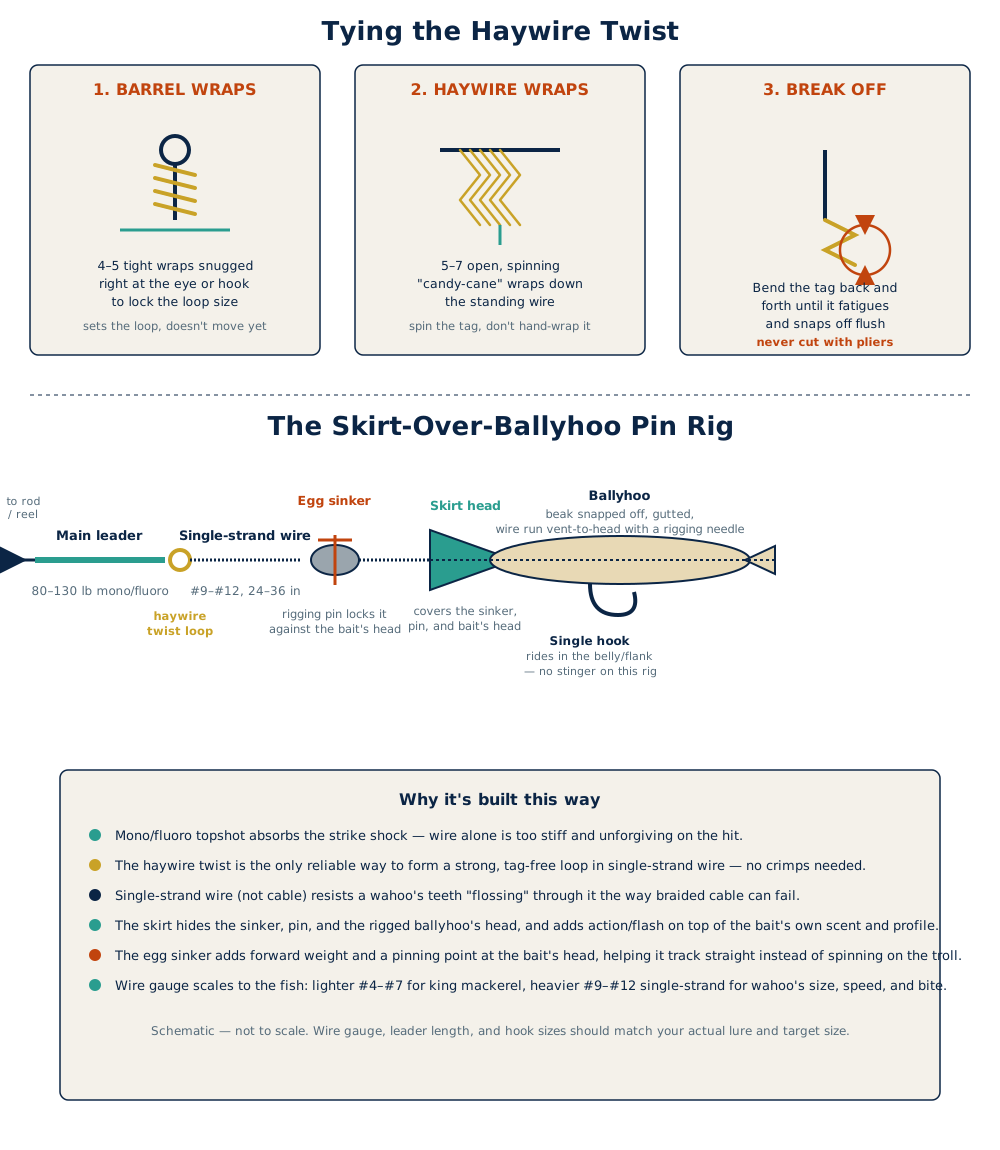
The haywire twist is how you form a strong, permanent loop in single-strand wire without a crimp — crimps work on cable but don’t hold reliably on solid wire the same way. It’s three steps, and the diagram above walks through all of them, but here’s the sequence in words:
- Barrel wraps. Cross the wire back over itself at the hook eye or lure eye to set the loop to the size you want, then make 4–5 tight, snug wraps right at that crossing point. This locks the loop size in place before you do anything else — it shouldn’t move once you start the next step.
- Haywire wraps. Below the barrel wraps, spin the tag end around the standing wire — don’t hand-wrap it — to form 5–7 open, evenly spaced crossing wraps, the “candy cane” look the twist is named for. Spinning rather than wrapping by hand is what keeps the wraps even and keeps the wire from kinking.
- Break off, don’t cut. Bend the tag end about 90 degrees to form a small handle, then work it back and forth repeatedly until the wire fatigues and snaps off on its own, flush with the last wrap. This is the step people skip, and it matters: cutting the tag with pliers leaves an angled, sharp stub that will find your hand, your line, or the inside of a rod guide sooner or later. A clean break-off leaves a flush, blunt end every time.
A dedicated haywire twist tool makes the barrel-wrap step easier to control than doing it with bare fingers or a random pair of pliers — I run the Eupheng anti-slip stainless haywire twist tool, which grips the wire without slipping while you make the wraps. It’s not strictly required — plenty of riggers manage with a good pair of needle-nose pliers and practice — but it takes some of the frustration out of learning the twist, especially on the heavier gauges wahoo rigs call for.
Rigging the ballyhoo under the skirt: the pin rig
Pulling a skirted lure — an Ilander or a sea witch — over a whole rigged ballyhoo is one of the standard offshore combos, and it works because it stacks two things a wahoo responds to: the skirt’s action, flash, and hidden hook, and the ballyhoo’s natural scent and swimming profile underneath it. The version below is a pin rig, which uses an egg sinker locked against the bait’s head with a rigging pin instead of a chin-weighted lure head — it’s the more common way to add weight and keep the bait tracking straight when you’re building the rig yourself rather than buying a pre-weighted skirt. Building one right comes down to five things in order:
- Pick a large “horse” ballyhoo and prep it — remove the gills and guts, and snap the beak off flush rather than leaving it on, since the skirt’s own head takes over the job the beak would normally do in a naked-bait rig.
- Slide an egg sinker onto the wire ahead of the bait, then push a rigging pin — a short, bent piece of wire — through the sinker and into the ballyhoo’s head to lock the sinker in place right against it. This is what keeps the sinker from sliding back down the leader and gives the whole rig a little forward weight, which is what keeps a ballyhoo tracking straight at speed instead of spinning or rolling.
- Run the wire on through with a rigging needle, from the vent forward through the body and out through the head alongside the pin, often anchored through both eye sockets to lock the head in place and keep the bait from sliding on the wire once it’s trolling.
- Set the hook in the belly or flank, positioned so it rides naturally along the bait’s body rather than sticking out at an angle that spins the whole rig off-axis. This rig runs a single hook — no stinger — since the sinker and pin are already doing the work of keeping the bait riding true, and a single well-placed hook keeps the rig simpler to tie and re-tie between baits.
- Slide the skirt up the leader last, so its cupped head seats forward over the sinker, the pin, and the ballyhoo’s head and eyes, hiding all three completely. The skirt’s trailing material extends back over the bait’s body, and the whole rig should sit as one continuous silhouette from skirt to tail — not a lure with a bait awkwardly hanging off the back of it.
Finish the leader the same way regardless of which end you built first: a haywire twist loop connects the single-strand wire (24–36 inches is typical on the bait itself) to a longer topshot of 80–130 lb mono or fluorocarbon running back to the main line. The mono absorbs the shock of the strike — wire alone is too stiff and transmits too much of that hit straight into the hook, which is a common way to pull a hook on the take rather than land the fish.
Where this rig actually fishes
This is a moderate-speed combo, not a high-speed lure-only rig — it’s the same bait pulled behind a planer at 6–8 knots to get it down in the water column, or run naked on the surface off a rigger or flat line as part of a standard trolling spread at typical trolling speeds. It’s not built for the 12–16 knot high-speed program, where jetted, weighted lures on cable do the work instead of natural bait — including behind a purpose-built high-speed planer, which pulls the same style of lure rather than this ballyhoo rig. See the high-speed wahoo trolling article for that end of the program.
What to actually buy
The twist tool: the Eupheng anti-slip stainless haywire twist tool grips single-strand wire cleanly through the barrel-wrap step, which is the part of the twist most people fight with when they’re first learning it.
For the wire itself, a rigging needle, egg sinkers, rigging pins, and the Ilander-style skirts — single-strand wire from brands like American Fishing Wire or Malin, a stainless ballyhoo rigging needle, a handful of egg sinkers and pre-bent rigging pins, and an Ilander or sea witch sized for wahoo — TackleDirect and most offshore tackle shops carry all of it; we’ll link specific listings here once an affiliate relationship with those suppliers is in place.
Bottom line
Two skills, one rig: a haywire twist that breaks off clean instead of leaving a hook-in-waiting stub, and a ballyhoo pinned under an egg sinker and built under a skirt so it swims as one bait instead of two mismatched pieces. Get the wire gauge right for the fish, get the sinker locked tight against the bait’s head so it doesn’t slide, and this combo pulls just as well behind a planer as it does off a rigger in a standard spread.
This article may contain affiliate links. If you buy through them, we may earn a small commission at no extra cost to you. Learn more.